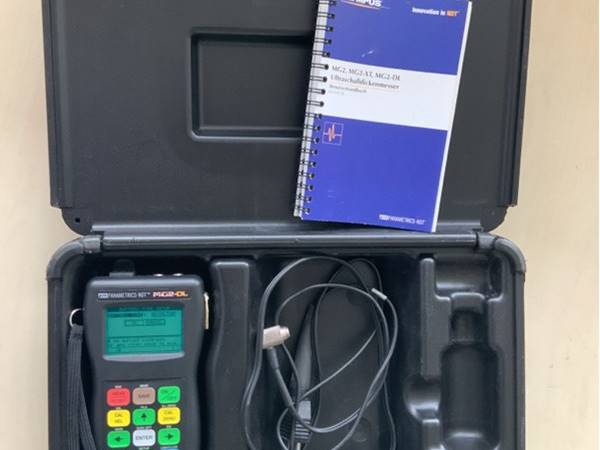
Olympus MG2-XT Ultrasonic Corrosion
1,500.00$
Features:
- Measurements from one side! Ultrasonic thickness gages make instant digital measurements by transmitting sound into a material from one side, making it unnecessary to cut the corroded part.
- Lightweight and pocket-size These handheld gages are small enough to fit in a toolbox or inside your pocket. They are ideal for quick inspections in hard-to-reach areas
- Intuitive, color-coded keypad You can directly access many important measurement features for time-saving operation. Strategically located keys are grouped together by color for easy operation.
- Large LCD with backlight The large numerals make it easy to read thickness measurements. In addition, you can easily view the electroluminescent backlit display from total darkness to bright sunshine.
- MG2-XT and MG2-DL are available with THRU-COAT®, B-scan and optional Live A-scan with Waveform Adjust
Description
Olympus MG2-XT Ultrasonic Corrosion
Olympus MG2-XT Ultrasonic Corrosion
Olympus MG2-XT These small affordable ultrasonic thickness gages are primarily designed for inspectors and maintenance engineers responsible for measuring the remaining thickness of internal corroded pipes, tanks, and other metal structures. Lightweight and ergonomically designed for easy one-hand operation, these gages provide cost-effective measurement solutions in many applications that require quick inspection of materials suspected of metal wall thinning.
Olympus NDT is known worldwide as a manufacturer of innovative, state-of-the-art ultrasonic testing products. We also believe that our customers deserve thickness gages that truly combine quality, accuracy, and ease of operation at affordable prices. We have accomplished this with three rugged modles: the MG2, MG2-XT, and MG2-DL. Each offers a range of practical measurement features to solve a wide variety of thickness gaging problems. Even better, they all have in common being manufactured by a company that takes pride in having the best customer support network in the industry.
Olympus MG2-XT Ultrasonic Corrosion
MG2-XT
The Olympus MG2-XT has all of the feature of the MG2 plus much more! B-scan, Gain Adjust, Auto Sensitivity Optimizations, Echo-to-Echo, Thru-Coat, Differential Mode, Hi-Low Alarm, and the optional live A-scan are added features to provide you with more measurement capabilities in tough applications. This gage is ideal when you make thickness measurements on coated or painted surfaces.
| Comparison Chart | MG2-DL | MG2-XT | MG2 |
| Thickness Range .020”-25.00” (0.50-635.0 mm) | Yes | Yes | Yes |
| Thickness Display Resolution up to 0.001” (0.01 mm) | Yes | Yes | Yes |
| Automatic Probe Recognition | Yes | Yes | Yes |
| High Temperature Capabilities | Yes | Yes | Yes |
| Fast Measurement Rate of 20 per second | Yes | Yes | Yes |
| Min/Max Mode | Yes | Yes | Yes |
| Freeze Mode | Yes | Yes | Yes |
| Zero Compensation Mode | Yes | Yes | Yes |
| Display Hold/Blank | Yes | Yes | Yes |
| Inches/Millimeters Mode | Yes | Yes | Yes |
| Live A-scan with Waveform Adjust (optional) | Yes | Yes | No |
| Gain Adjust | Yes | Yes | No |
| B-scan | Yes | Yes | No |
| Auto Sensitivity Gain Optimization | Yes | Yes | No |
| Differential Mode | Yes | Yes | No |
| Hi-Low Alarm | Yes | Yes | No |
| Thru-Coat | Yes | Yes | No |
| Echo-to-Echo | Yes | Yes | No |
| Internal Datalogger | Yes | No | No |
| 2-D Grid | Yes | No | No |
| GridView | Yes | No | No |
| GageView PC Interface Program (optional) | Yes | No | No |
Thru-Coat
With this patented technology, the gage simultaneously displays the thickness of the coating and the true metal thickness, using a single backwall echo. Each measurement is adjusted for their calibrated material sound velocity. Thru-Coat measurements use the D7906-SM and D7908 transducers.
Live A-Scan with Waveform adjust
This optional live A-scan mode allows the user to view the ultrasound waveform (or A-scan) directly on the gage’s display, verify the thickness reading, or make manual adjustments to gain and blanking settings to maximize measurement performance for challenging applications. This helpful option has the following feature: Manual Gain, adjust, Extended blanking, echo blank range and dealy.
Gain Adjust
This Feature is very helpful when making measurements on sound-attenuating materials such as cast metals:
- Preset gain Adjust to High, Low, or Standard
- Manual Gain Adjust can be set in 1 dB increments (Live A-scan mode only)
Extended Blanking
Allows blanking of unwanted echoes due to material surface “noise” from rough or irregular surfaces (Live A-scan mode only.)
Echo-to-Echo
The gage displays the true metal thickness and ignores the thickness of the coating layer, using multiple backwall echoes.
- Auto Echo-To-Echo
- Manual Echo-To-Echo (Live A-scan mode only) that allows:
- Gain Adjust
- Extended Blanking
- Echo Blanking
B-scan Corrosion Mapping
The MG2-XT and MG2-DL offer the B-scan feature that converts live thickness readings into cross-sectional images drawn on the display. This standard feature is very helpful in applications when it is desired to review how the thickness is changing over a distance. When the user activates the B-scan feature it starts drawing the crosssectional thickness when the transducer makes contact with the material. The Freeze Min function can be used to display the Minimum thickness of the scanned area. Up to 350 B-scan images can be stored in the MG2-DL’s data logger.
High Temperature Surfaces
The MG2-XT and MG2-DL are ideally suited for making stable thickness measurements on hot material surfaces, up to 932ºF or 500ºC, with the D790 series transducers (D790, D790-SM, D790-RL, D790-SL). The Zero Compensation feature on the MG2 Series enhances the accuracy of the readings on hot surfaces by compensating for temperature changes in the transducer delay line due to thermal drift.
Features:
- Measurements from one side! Ultrasonic thickness gages make instant digital measurements by transmitting sound into a material from one side, making it unnecessary to cut the corroded part.
- Lightweight and pocket-size These handheld gages are small enough to fit in a toolbox or inside your pocket. They are ideal for quick inspections in hard-to-reach areas
- Intuitive, color-coded keypad You can directly access many important measurement features for time-saving operation. Strategically located keys are grouped together by color for easy operation.
- Large LCD with backlight The large numerals make it easy to read thickness measurements. In addition, you can easily view the electroluminescent backlit display from total darkness to bright sunshine.
- MG2-XT and MG2-DL are available with THRU-COAT®, B-scan and optional Live A-scan with Waveform Adjust
Specifications Olympus MG2-XT :
| Measurements | |
| Measurement Mode: | Pulse echo with dual element transducers |
| Thickness Measurement Range: | 0.020 to 25.00 inch (0.50 to 635.0 mm) |
| Material Velocity Calibration Range: | 0.0200-0.7362 in/μsec (0.508- 18.699 mm/μsec) |
| Display Modes | • Digital Thickness Readout • Cross-sectional B-scan • A-scan or Waveform (optional) |
| Thickness Display Resolution: | LOW: 0.01” 0.1 mm STANDARD: 0.001” 0.01 mm |
| Measurement Rates: | Standard Rate: 4 per second. Fast Rate: 20 per second |
| Min/Max Mode: | Measures and recalls minimum or maximum thickness at 20 measurements per second. |
| Freeze Mode: | Freezes display to instantly capture critical thickness. Minimizes transducer couplant lift-off error and facilitates High Temperature measurements |
| Automatic Probe Recognition: | Automatically recognizes the listed Panametrics-NDT transducer types. Adjusts internal parameters and corrects V-path error |
| Zero Compensation: | Compensates for transducer temperature and zero offset. |
| Display | |
| Display Hold/Blank Mode: | Display holds or blanks after measurement |
| Electroluminescent Display Back Lighting: | Selectable as “On” or “Auto On” |
| Receiver Bandwidth: | 1-18 MHz (-3 dB) |
| Metric/English Mode: | Metric or English |
| Display Languages: | English, French, German, Spanish, Italian, and other custom languages |
| Power Supply | |
| Battery: | 3 AA alkaline batteries |
| Operating Time: | 150 hours typical battery life, 30 hours continuous with backlight on |
| Low Battery Indicator: | Continuously indicates battery status |
| Battery Saver: | Auto Power Off/Continuous On |
| General | |
| Environmental IP-65 Compliant: | Splash-proof, impact-resistant case. Sealed, color-coded keypad with tactile and audible feedback. |
| Operating Temperature Range: | -10°C to +50°C, +14°F to 122°F. |
| Size: | 3.31” W x 6.0” L x 1.56” H |
| Weight: | 12 oz. (0.34 kg) |
| MG2-XT and MG2-DL Additional Specifications | |
| Thru-Coat® Measurement: | Measurement of true metal and coating thickness using a single backwall echo (with D7906-SM and D7908 transducers) |
| Thru-Paint Echo-to-Echo: | Displays the true metal thickness and ignores the thickness of the coating layer, using multiple backwall echoes. – Auto Echo-to-Echo – Manual Echo-to-Echo (Live A-scan mode only) that allows: • Gain Adjust • Extended Blanking • Echo Blanking |
| Gain Adjust: | – Preset Gain Adjust to High, Low or Standard – Manual Gain Adjust can be set in 1 dB increments (Live A-Scan mode only). |
| Extended Blanking: | Allows blanking of unwanted echoes due to material surface “noise” from rough or irregular surfaces (Live A-scan mode only). |
| Auto Sensitivity Gain Optimization: | Allows the normal measurement sensitivity to be automatically increased or decreased depending on the thickness and material noise level. |
| Alarm Mode: | Programmable Hi-Low set points with audible and visual indicators |
| Differential Mode: | Displays the difference between the actual thickness measurement and a user-set reference value |
| Live A-scan with Waveform Adjust: | Optional live A-scan mode allows the user to view the ultrasound waveform (or A-scan) directly on the gage’s display. Has the following features: Manual Gain Adjust, Extended Blanking, Echo Blank Range and Delay. |


